Playing Black Powder Cavalry
Marshal Grant and I have been developing a few select House Rules for how we play Black Powder games with Napoleonics in mind. One which we have been working on for a year now is how to play cavalry. By way of context, we have been collecting 28mm armies for many years at a representative troop scale of 1:20. This means that our cavalry regiments are often 24 figure units on average or can be even greater. This method of collecting and gaming has never really translated that well into Black Powder games for us, that is until now.
Whilst our infantry unit sizes transfer generally across to recommended unit sizes in the Black Powder rules, our cavalry regiments are always significantly oversized. If you take my British Peninsular cavalry for instance, a 24 figure regiment is oversized to the tune of 6 figures beyond the maximum 'large' size. This was incongruous inasmuch as our 1:20 representation should translate to 'standard'.
We did a lot of reading between the lines and scrutinized the unit size commentaries in the Appendices but nothing was made crystal clear. Then we realized that we were playing cavalry all wrong when we embraced the squadron as the tactical unit of cavalry and not the regiment. We have returned to history once more and all was revealed.
Whilst regiments were often fielded, they nevertheless fought as a combination of squadrons. Accepting this, we play tested our new approach to cavalry fighting over the last weekend and it completely changed the Black Powder game ... very much for the better.

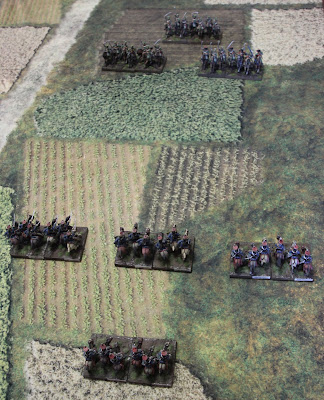
Here we have a British light cavalry regiment deployed in a pattern of four squadrons - A to D. This is quite a flexible formation as the first two squadrons (A and B) provide mutual flank support and gain rear support from either squadrons C or D. In Black Powder, the winner of a melee is calculated including factors of up to two flank and one rear support - so this mutual supportive formation can be important.

The optimal formation of squadrons would be the above image if you charge B squadron at the enemy with A and C in flank and D squadron in rear support. Of course the dice Gods have to be in your favour but here's where we have applied our house rule to the equation - it's a Regimental Order. Hold that thought.
If you take our 24 figure light cavalry regiment, it can have a maximum of 8 Hand-to-Hand (H2H) combat dice as a whole regiment formation. Whilst 24 figures is an historical standard regiment, such a formation is deemed 'Large' in Black Powder but again, we believe a single regimental sized combat formation was rare: hence 18 figures is deemed 'large'. Whilst this would make nearly all of our 1:20 regiments 'Large' which is not how the game is designed, again we are mindful that the squadron is the tactical unit.
If we split the regiment into it's fighting squadrons, each squadron at 6 figures counts as a 'Small' unit with four (4) H2H combat dice and a Stamina of 2 each. This is the trade-off in that by fighting as separate squadrons, each squadron is more vulnerable but likely better supported. If a squadron is routed, the regiment has an overall better chance of surviving and keeping in the fight - requiring a Break Test each if in support of a squadron routing from melee.
Getting back to the concept of four 6 figure squadrons - there is an advantage across the whole regiment in terms of H2H dice as 4x4 = 16 for H2H but as you can appreciate, if they are supporting then their H2H value is not in play so that shouldn't matter. There is also a Stamina gain as 4x2 = 8. A squadron; however, as a 'Small' unit is also relatively vulnerable and once casualties equal 'Stamina' they can neither charge or counter-charge reducing their ability to support offensive action or survive an attack themselves. Again, it's a trade-off.
Getting back to the Regimental Order concept, we treat a combination of squadrons from the same regiment like we do a Brigade Order. Provided all squadrons are acting in unison (such as putting in a charge) they only require one successful Command Roll for all of them to co-operate. As soon as you want one squadron to act differently, such as split an attack, then you require more Command Rolls.

Another trade-off or consideration in fighting a squadron is whether or not to counter-charge when charged by the enemy.

In the above example the French (1 & 2 squadrons) declared a Charge against B Squadron and made their successful Command Roll. The British player elected to counter charge in which case the unit is moved to the half distance between the units. In doing so, B Squadron moves beyond his supporting squadrons - losing up to +3 on the subsequent melee calculation. By counter-charging the squadron has an even chance of winning the dice fight but the French have the +1 advantage with a demi-squadron in rear support.
Should the British squadron survive to the next round of combat, it may receive supports from Squadrons A,C and D if they can close to 6". If not, then the regiment only loses one squadron and remains in play with 75% fighting effectiveness.
On the subject of demi-squadrons (two squadron formations) this might be your happy medium. Using our British example, a combined two squadron formation provides 12 figures taking the formation to 'Standard' size with 6 H2H combat dice and a Stamina of 3. The practice of a three squadron formation was also in effect - essentially being a regimental formation with a single squadron in reserve. Again, our example provides a 'Large' 18 figure option with 8 H2H combat dice and a Stamina of 4 but with much reduced support at least from within it's own regimental capability.
What a larger formation gains in contact melee it loses in support.
As an aside, where two squadrons of the same regiment join the same melee, they then fight as the one formation as it's what they effectively become - getting 6 H2H combat dice and not 2 x 4. We do not allow them to pretend they are are different units and they necessarily merge in melee whether they started that way or not.

Squadrons are free to change formation (merging or separating) but in doing so, it takes a move to do so. They must also account for Stamina lost.
If (say) a demi-squadron has a point of Stamina against it and splits into two separate squadrons, one of them must take the point of Stamina. Conversely, when combining two squadrons (or more) the new larger formation must absorb all Stamina loss from all of the combining squadrons. Decisions, decisions!
Under our House Rule, a cavalry brigade of two such regiments has it's strength measured in terms of the number of squadrons - in this case the brigade strength is 8 units.
We find that this elevates Black Powder to as whole new dynamic and it really does work. Our cavalry is more effective, stays in play much longer and has a greater impact on the game. For us, it's been a breakthrough. We rely on room to maneuver; however, so if you cram your table tight then this will not likely work for you. Also, if you have built your armies against the Black Powder rule rather than against an historical ORBAT, this might not matter to you so much.
For us, we have a lot of figures and this adaptation allows us to play them more effectively. It's a little more complex but not overly so. Results from combat sends squadrons retiring backwards in no time and before long your regiment's squadrons are scattered all over the table without support unless you manage them properly.
If anyone wants to give this a try (if you didn't already do it) then tell me how you go. We are really enjoying it.


Nice gaming, Greg. I really enjoy Black Powder. Have a Hail Caesar game tomorrow. Interesting how some of the mechanics are slightly different between the two rules, but have the same overall flavor.
ReplyDeleteThanks Dean. I agree about the curious differences but as you say, they are essentially very similar which is why I like them.
ReplyDelete