Desert Gaming Cloth
Well I'm back home in Australia in the curious situation with time on my hands with most of my painting and modelling set up back in Tonga. Nevertheless, I am busying myself when by myself and am trying to emulate the fabulous looking work of other Bloggers and trying to make my own desert terrain gaming cloth.
 I have studied several approaches in how to achieve what I'm after and am taking my principle example from John's 1000 Foot General Blog (which I follow) and his posting on how-to make 'Desert Wasteland Terrain'. The only diversion from John's approach in this exercise is that I have opted for a calico sheet rather than canvas. I was concerned that the canvas would retain too much rigidity and I want to maximise the cloth's ability to settle over under-cloth hills.
Just before I continue I wanted to share my experiences with terrain - specifically the ground. Last year I threw away my tried and true terrain boards. They were based on 600mm square particle (chip) board 18mm thick - I used them to great effect for over 20 years. They were very effective and were covered in several tones of paint with sand - desert, green fields and snow. The problem was they were very heavy and no good for transport. In a clean out of my garage I decided to make the change. I will still have foam-board tiles for specific battlegrounds - especially when depth is required for trenches, rivers, coast lines and ravines - but I am committing to the development of a series of cloth battlegrounds for all terrain types over time.
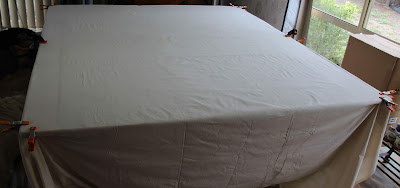
 Back to the project. Everyone advises to clamp the cloth and warned of the caulking shrinking tendencies when it sets. Always one to learn from others I dutifully rounded up every clamp I had and fixed the sheet to my three trestle tables. I am going for a 1800x2700mm surface (6'x9') but my available table space and clamp numbers dictate this will be done in two complete and separate stages. Unlike canvas (I suspect) the calico is easy to iron so I steam ironed it flat. Beneath the calico is a layer of old bed-sheets and a vinyl outdoor table-cloth which presents a firm smooth and non-wrinkly surface. I can advise that I enjoyed a crease free experience throughout this build.
The technique to create the textured cloth is to apply builder's caulk and spread it thinly on top of and into the calico cloth using a spatula or any edged spreader. The 'caulk' needs to be the sort of filler which is flexible when set. I ended up buying Selleys No More Gaps but there are cheaper options available. No More Gaps was retailing for around AUD11.00 per 450g tube. I ended up opting for the premium product simply because that product had more information on it which tells me that when set it retains up to +/- 20% joint movement and +350% stretch. Other products which were half price or better told me squat.
Immediately, once the caulk is spread in smaller sections (approximately 1/2 to 3/4 metre square) I then spread the texture material over the wet caulked cloth. I say 'wet' but these filler products are a very thick paste (goo) and not at all runny. I chose three grades of texture - river sand, clumping clay and zeolite.
 The river sand I sourced myself, the clumping clay is a cat litter and zeolite is a micro-porous mineral marketed as a fat-soaker for BBQs (pictured above and distributed in Australia from New Zealand). By volume the sand is heaviest followed by the clumping clay and the lightest is zeolite (half the weight of the clay). By texture the sand is my finest grit, then the clay and the largest or coarsest is the zeolite. For ease I'll refer to all three products for this exercise as 'grit'.
 The above image gives you an idea of how the process goes. The flatter and more taut the cloth the easier it is to spread the caulk. One of the problems with this kind of project is that if it works, I am generally not required to repeat the exercise as I got what I needed - so I gain little experience with experimental or repeat applications.
I spread the caulk as thinly as possible whilst not allowing the cloth to show through - well, too often anyway. I'm relying on this filler product being super adhesive, forming a part of the cloth as it embeds into the weave of the fabric and on it really gripping my grit. When painted, the paint will also further bind the grit to the caulk and seal the finish.
 The above image shows how far one 450g tube of caulk covers. You can also see the caulk tube in the caulk-gun - you'll need one of these. Once I got into a rhythm it really didn't take too long. I used a 50mm spatula and I really don't think a wider one would have worked as well. Also using John's tip, I rolled the grit into the caulk using an empty tube of caulk like a rolling pin. It tended to crush the zeolite a little but that's fine if it sticks.
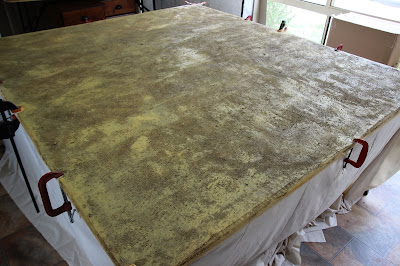
 The first stage 1800x1800mm (6'x6') took about 2-3 hours and used three 450g of caulk. I spread my grit by hand so it's unevenly applied. Particularly when it comes to the river sand, there are grittier sections than others and I could have most likely gone heavier on the grit - but its a good coverage all the same. No More Gaps advised 72 hours setting time. I didn't want to stuff this up so I moved onto other projects and dutifully waited - well 48 hours anyway.
 I ran a vacuum cleaner over the sheet to pick up loose grit. Using the bare nozzle and careful to cant it about 45 degrees I was please to see the sheet behave very cloth like under the suction. I reckon to have picked up about 10% what I have put down - I think that's reasonable.

I then applied my first base coat of paint. I used a Taubmans brand 'Inca Brown' I had made up in 2008 still well preserved in my shed. I applied it using a spare car washing sponge I had which I cut in half. With a latex glove I applied it undiluted and by the end of the process had developed a rolling action as I sponged the paint onto the sheet. Through the process I reckon to have lost another 5-10% of the grit and moved a bit about - but not enough to dishearten me

After a further 24 hours the paint was bone dry - we had the summer sun come out and my back room gets very warm and with a pedestal fan blowing across my work it was bone dry the next day. You can see from the preceding image that sponging paint missed some areas - the pale calico base showing through. Unless brushing or spraying I image this is unavoidable. It didn't worry me overly.
Let me also stress how well the grit set in after the coat of paint. Only the spots of clumped paint and sand which had formed were loose enough to brush away - the rest was well and truly a part of the terrain now. It still looked a bit bleak to me - until I started with the next coat of dry brushing.
 There always seems to me to be two moments in new projects where I try something new - a point where my confidence in a successful outcome fails me then the recovery point where the very next step just reveals the end-game. Dry-brushing the sand coloured paint just transforms the cloth. The process itself revealed how much a part of the mat itself the grit had become - 95% resilience.
The depth of texture provided by the three grades of grit and the caulk itself provide shades and depth for the dry brush coat. Apart from some light grey or white highlighting a different or lighter sand/brown is unnecessary.
 As you can see from the above shot, quite a lot of granularity is retained and the patches of barer caulk provide well for sandier recesses in the fall of ground.
 And this is really the completed product. I lightly dry-brushed the entire surface with white (a craft paint) using a soft mid-sized house paint brush. I concentrated in a circular motion those areas with rougher grit texture (the zeolite in particular) as well as the sandy recessed (barer) areas. I find the white softens the whole palate and washes out the impact of the sand colour - which is what I want.
 Parting with a macro shot, all I have to do is trim my cloth and find a big enough tube of PVC pipe to roll it onto - another moment of truth. I will come back with a follow up comment on how it travels and performs over hills.

Just before I continue I wanted to share my experiences with terrain - specifically the ground. Last year I threw away my tried and true terrain boards. They were based on 600mm square particle (chip) board 18mm thick - I used them to great effect for over 20 years. They were very effective and were covered in several tones of paint with sand - desert, green fields and snow. The problem was they were very heavy and no good for transport. In a clean out of my garage I decided to make the change. I will still have foam-board tiles for specific battlegrounds - especially when depth is required for trenches, rivers, coast lines and ravines - but I am committing to the development of a series of cloth battlegrounds for all terrain types over time.

 |
| River sand (left), clumping clay (centre) and zeolite (right) |
Immediately, once the caulk is spread in smaller sections (approximately 1/2 to 3/4 metre square) I then spread the texture material over the wet caulked cloth. I say 'wet' but these filler products are a very thick paste (goo) and not at all runny. I chose three grades of texture - river sand, clumping clay and zeolite.


I spread the caulk as thinly as possible whilst not allowing the cloth to show through - well, too often anyway. I'm relying on this filler product being super adhesive, forming a part of the cloth as it embeds into the weave of the fabric and on it really gripping my grit. When painted, the paint will also further bind the grit to the caulk and seal the finish.


I then applied my first base coat of paint. I used a Taubmans brand 'Inca Brown' I had made up in 2008 still well preserved in my shed. I applied it using a spare car washing sponge I had which I cut in half. With a latex glove I applied it undiluted and by the end of the process had developed a rolling action as I sponged the paint onto the sheet. Through the process I reckon to have lost another 5-10% of the grit and moved a bit about - but not enough to dishearten me

After a further 24 hours the paint was bone dry - we had the summer sun come out and my back room gets very warm and with a pedestal fan blowing across my work it was bone dry the next day. You can see from the preceding image that sponging paint missed some areas - the pale calico base showing through. Unless brushing or spraying I image this is unavoidable. It didn't worry me overly.
Let me also stress how well the grit set in after the coat of paint. Only the spots of clumped paint and sand which had formed were loose enough to brush away - the rest was well and truly a part of the terrain now. It still looked a bit bleak to me - until I started with the next coat of dry brushing.


The depth of texture provided by the three grades of grit and the caulk itself provide shades and depth for the dry brush coat. Apart from some light grey or white highlighting a different or lighter sand/brown is unnecessary.


Comments
Post a Comment