Be2a: Part 5
As you will have noticed from the activity or lack thereof on any of my blogs, progress to date has been glacial. Glacial that is, unless you are into research and rules writing like I seem to have become. I'll leave that to another post but to say I derailed myself is an under-statement and half. For the first time in weeks I finally motivated myself to sit quietly at my work table instead of the library and move the latest builds toward their conclusion.
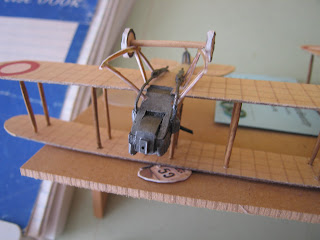 As you can see, I fixed the top wings and painted the struts the same wood colour as the skid assembly and undercarriages, which are now also fixed. Another error in my modelling was the angles of the twin exhausts. Both models have the exhausts running wide at the front end, narrowing at the rear. They should in fact be straight and parallel. This became an issue when attaching the skids but in gaming, no one will notice. In other words, this will win no awards for precision or accuracy but should serve as a fair enough representation for my purposes.
What I am pleased about; however, is how the engines and exhausts appeared after painting. After undercoating, they got a thick coat of gloss black mixed with gun metal (enamels) and a heavy dry-brush with gun metal and then a lighter dry-brush with gun metal mixed with steel/aluminium. They have smoothed over the balsa base quite nicely to my eye. I don't think I'll bother dirtying the engines of planes - but I may change my mind.
 The cardboard skids seem to have ended up sufficiently rigid (thank goodness) and provided workable flexibility, which given the exhaust situation, made them preferable to my toothpick versions. I'm also pleased how the tyres I made have turned out and they should pass muster after painting - which is underway. To be honest, both planes pitch too far back on their undercarriages when upright but as they will spend most of their time mounted on flying stands, they'll look fine - I hope.
The last thing I need to attach is the tail rudder which I will also fit with a double ended pin joint for further strength - all fused with SupaGlue. Done by tonight, all that will be left is the rigging for which I have purchased some 35wt rayon thread with a metallic twist colour - we shall see how it comes off. I'm looking to avoid painting wires - it's bad enough I'm rigging these things at all.

What I am pleased about; however, is how the engines and exhausts appeared after painting. After undercoating, they got a thick coat of gloss black mixed with gun metal (enamels) and a heavy dry-brush with gun metal and then a lighter dry-brush with gun metal mixed with steel/aluminium. They have smoothed over the balsa base quite nicely to my eye. I don't think I'll bother dirtying the engines of planes - but I may change my mind.

The last thing I need to attach is the tail rudder which I will also fit with a double ended pin joint for further strength - all fused with SupaGlue. Done by tonight, all that will be left is the rigging for which I have purchased some 35wt rayon thread with a metallic twist colour - we shall see how it comes off. I'm looking to avoid painting wires - it's bad enough I'm rigging these things at all.


I'm glad to see you back blogging. I had been wondering how the build was going.
ReplyDeleteCheers
Will