Dutch Artillery Limber: More than meets the eye Part 1
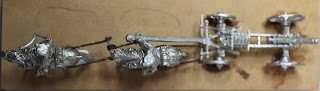
I've long played my wargames with the convention of one limber per battery to represent my artillery on the move. When it's time to shift, limber model comes on and when they deploy, guns and crew go down and limber comes off. For my developing Papelotte (Waterloo) scenario I have a reduced two-gun Dutch horse artillery battery in play so it was time to build the Perry Miniatures DB44 model being a four horse limber team - the only one on offer.
 Not many (or any?) manufacturers make a full galloping limber team which is a crying shame. This model is a walking limber but beggars can't be choosers. I determined to go the extra mile with this model and rig the full harness as best I can. In this effort I have to say the figures themselves don't offer much assistance. The rig does not provide for the forward harness array so I've had to improvise and kit-bash significantly.
I like to base my larger models and artillery prior to painting just to give me something to grip up. I also find that the model as a whole retains better structural integrity if I build as much as I can before painting. I placed and traced the arrangement on the base and then cut grooves into the 5mm MDF to better seat the gun carriage and the wheels of the piece itself. I used Selleys Araldite to glue the metal on metal parts and Liquid Nails to fix them to the MDF. I ensured the limber pole was elevated to the correct height when setting the piece.
 A few observations: like a lot of models requiring assembly, the manufacturers provide little in the way of a guide on how to assemble the model. As I'm thousands of kilometers from my home library it was onto the internet for some reference shots. As you may know, the drivers should be on the left of the team looking forward. The second detail to be aware of is that it's the horses with the rump harness array (above) which is the team nearest the carriage (to the rear). I was almost going to stuff that up until I noticed.
 The next thing I needed to do was drill receiving holes at the correct points in the harness to fix my cables. You may not be able to see this clearly enough but on the rearward pair they are at the forward section of the rump harness (that's what I'm calling it) just behind the saddle. With correct manipulation of my hand drill, I created channels leading into the receiving holes at the same time. You need two cables for each mount. For the forward pair, they enter the rear of the harness skirt and you can see where the sculpted cable starts on the figure - so make the connection there.
 I can't recall when and where I picked up this modellers thread but it's perfect - I suspect it's made for model ship builders.
 You might see the receiving holes I drilled just behind the scabbard of this rearward rider. Like all of my mounted figures, I drill holes in the riders seat and saddle and fix with a steel wire pin with Araldite prior to undercoating.

Without wanting to waste my thread, I allowed a bit of play because I was going to need to tie it off at various points.

Okay now here's an experiment which I was compelled to abandon. Either a part was missing with my purchase or the model does not come with a forward mounting for the forward team to hitch on. I decided to start manufacturing my own only to find out that the limber centre pole does not extend far enough past the rear team to allow for the extension to be built as I have seen. Oh well, I cut it off and improvised with forward cabling tied directly to the pole.
 Next step: glue the riding team to the base and wait. Once the glue set, I then tied off the rear cables to the limber hitch rail using Superglue. I also elected to coat the cables completely in Superglue to let them set rigid for undercoating with the rest of the model.
 I made some hard plastic hitching poles for the forward team and Superglued them. I then fixed them in turn to the limber pole with some cable off-cuts from the centre of the hitching pole to the limber pole.
 I can only apologize at this point for what must be a gross failure on my part to correctly identify the correct names for the component parts of an artillery limber of the period. Anyone wishing to set the record straight must be my guest and feel free to post an insightful comment.
 I think going to this sort of effort is akin to the rig/no-rigging approach to age of sail model ship building and wargaming. It's not for everyone and plenty wonder why I'd bother. I wonder too at times.
 It seems that the Dutch limber on offer is from their French ordinance and they fielded British variants also during the 100 Days campaign. Now this is for my horse artillery and I am surmising that the drivers of the train do not differ between horse and foot batteries - I'll be sure to check. Perry Miniatures don't give me options anyway and there's not a lot on offer for the Dutch Belgian forces in any event. It is only a four-horse team and again, there were no additional pairs on offer for the Dutch. This model will represent Bijleveld's battery which copped a pounding at Quarter Bras prior to Waterloo and lost a lot of horses. Therefore I am comfortable enough with only a four-horse team for the horse artillery for my scenario.
 The riderless team I'm painting separate to the rest of the model and will attach them afterwards. This will allow me far greater access to the model when I'm painting it. I've painted entire limber models before and I'm keen to avoid it - what a painful exercise!
 I may end up fixing both forward hitching poles to each other - I'll see how I feel later. There's all sorts of detail I could have gone into for this model. For a start, there's a lovely set of artillery equipment by Black Hussar Miniatures which could be fixed to the carriage. Also, I've never seen anyone make mounted horse artillery crew who would have ridden along with their limber crews - so I suppose that rules that option out. Anyway, time for undercoating.
This has been a small journey of discovery for me and I hope someone gets something out of this lot.

I like to base my larger models and artillery prior to painting just to give me something to grip up. I also find that the model as a whole retains better structural integrity if I build as much as I can before painting. I placed and traced the arrangement on the base and then cut grooves into the 5mm MDF to better seat the gun carriage and the wheels of the piece itself. I used Selleys Araldite to glue the metal on metal parts and Liquid Nails to fix them to the MDF. I ensured the limber pole was elevated to the correct height when setting the piece.


Without wanting to waste my thread, I allowed a bit of play because I was going to need to tie it off at various points.

Okay now here's an experiment which I was compelled to abandon. Either a part was missing with my purchase or the model does not come with a forward mounting for the forward team to hitch on. I decided to start manufacturing my own only to find out that the limber centre pole does not extend far enough past the rear team to allow for the extension to be built as I have seen. Oh well, I cut it off and improvised with forward cabling tied directly to the pole.


This has been a small journey of discovery for me and I hope someone gets something out of this lot.


Very nice! That's a lot of detail that most gamers can't be bothered with!! I doft my hat to you Sir!
ReplyDeleteThanks Ray. It's a symptom of how much time I spend building armies as opposed to how little time I spend actually playing wargames.
ReplyDeleteVery impressive prep work going on here. I know the end result will be equally impressive too.
ReplyDeleteBeautiful job on these Greg.
ReplyDeleteCheers Dean and Carlo. They'll look better when I've finished the basing.
ReplyDelete