Be2a: Part 2
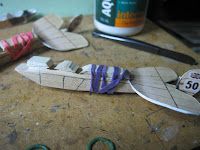
Up early this morning and got stuck straight back into my fuselage re-build. Using rubber bands to ensure a better bind with my PVA glue, I built up the top of the fuselage to get the shape I'm after. Ah, rubber bands ... where I would I be without them? I since detached the tail plane rudder section to make it easier to work with and realised I'm going to need to start piercing sections now in order to enable rigging later in the build.
A delicate carve and a quick sanding and the upper fuselage has taken shape. It remains to be seen if I'm going to get away with not painting all of the fuselage now as previously, the neat lines of the body work and the colour of the balsa was matching nicely with the printed colour of this aircraft. Somehow, I doubt it.
I have carved out the the engine bay and built the engine blocks - one from the paper model and one from balsa of all things. I'm anticipating giving them both a coating in diluted PVA later on to bind the parts together and give it a smoother shellac as it will be painted in metallics. Also, having learnt from previous models, now is the time to measure the crew and prepare them for painting.
Remembering that the Be2 series suffered from a curious pilot/observer configuration I have tested the crew figures in their cockpits and trimmed the lower torsos to fit. All four figures have suffered major amputations to achieve a fit and whilst the figures are slightly over sized for the models, they will look smaller after painting against the overall airframe which is so much larger with wings and undercarriage. The crew have now been glued to craft sticks for painting separately but I intend returning the observers before fixing the top wing for my sanity's sake. One crew will have the pilot turning to the rear and the observer with Lewis gun hoisting his gun to shoot behind. The other crew is looking to the front and lobbing a bomb or two - so a model for all occasions.
The pistons are cut from a couple of cocktail sticks or toothpicks, sanded and white glued to the engine block. I've been generous with the PVA here as will have to run an emery board across the top of the assemblies to achieve a flat, level surface for the exhaust pipe. Soon I will cut the spinning propellers with the intention of fixing them with cut down pins as the final touch to both models.
I've been asked the details of who made these plans and for the life of me, I can't locate the CD. I'll keep looking and get back to you.


I see you've made a lot of progress. They are looking good.
ReplyDeletelooking good, my DII should be in the air by next week!
ReplyDeletecheers
Matt